

Podcast recording hacks do not need to be complicated or expensive. Sometimes, a small change in your room, microphone position, camera angle, lighting, or editing workflow can make your podcast sound and look much more professional.
Ever wondered why some podcasts grab your attention immediately while others feel flat, noisy, or hard to watch?
The difference is not always the most expensive gear. A good podcast usually comes from a combination of clean audio, controlled environment, proper mic technique, real-time monitoring, good lighting, stable camera framing, and smart editing.
In this guide, we will break down practical podcast recording hacks and best practices that can help you improve your audio, video, workflow, and overall production quality — whether you are recording at home, in an office, or inside a professional podcast studio.
Still choosing your podcast equipment?
Read this guide too: The Best Podcast Equipment in Malaysia
Quick Answer: What Are the Best Podcast Recording Hacks?
The best podcast recording hacks are to control your room noise, keep consistent mic distance, monitor audio during recording, lock your camera settings, use proper lighting, and edit for clarity instead of over-polishing everything.
Good podcast production is not about making everything perfect. It is about removing distractions so your audience can focus on the conversation.
Why Podcast Recording Quality Matters
Podcast recording quality affects how people experience your content.
If your audio is noisy, your camera framing is messy, or your lighting looks inconsistent, your podcast can feel less credible even if the conversation is valuable.
This matters even more for video podcasts because your content is no longer consumed only on Spotify or Apple Podcasts. People may discover your show through YouTube, TikTok, Reels, Shorts, LinkedIn, or embedded clips on your website.
Good Recording Quality Helps You:
- Sound more professional and trustworthy.
- Make your podcast easier to listen to for longer periods.
- Create better short clips for TikTok, Reels and YouTube Shorts.
- Reduce editing problems after recording.
- Improve guest confidence during the session.
- Build a stronger brand impression from episode one.
1. Control Your Recording Environment
Your room is part of your sound.
Even the best microphone can sound bad in a noisy, echoey or untreated room. Air-conditioning hum, traffic noise, fans, hard walls, glass, tiles, and empty spaces can all affect your podcast audio.
A quiet and controlled recording environment is one of the simplest ways to improve podcast quality before you even touch the editing software.
Common Room Problems
- Echo: Usually caused by hard walls, tiles, glass or empty rooms.
- Background noise: Air-conditioning, fan, traffic, keyboard sounds or people nearby.
- Uneven sound: Different speakers sounding inconsistent because of room reflections.
- Uncontrolled ambience: Noise that feels acceptable during recording but becomes obvious during playback.
Simple Room Hacks
- Record in a smaller room with curtains, carpet, sofa or soft furniture.
- Turn off noisy fans or appliances before recording if possible.
- Avoid recording next to windows facing traffic.
- Use thick curtains, rugs, acoustic panels or bookshelves to reduce reflections.
- Do a 30-second test recording and listen back before the full session.
If the room sounds better at the recording stage, editing becomes much easier later.
Want to understand audio quality deeper?
Read this guide: The Importance of Audio Quality in Podcasting
2. Get Your Microphone Technique Right
Microphone technique is one of the most underrated podcast recording hacks.
You can use a good microphone, but if you sit too far, move around too much, speak directly into the capsule with harsh breath, or keep changing your posture, your audio will still sound inconsistent.
Good mic technique helps your voice sound clearer, fuller and easier to edit.
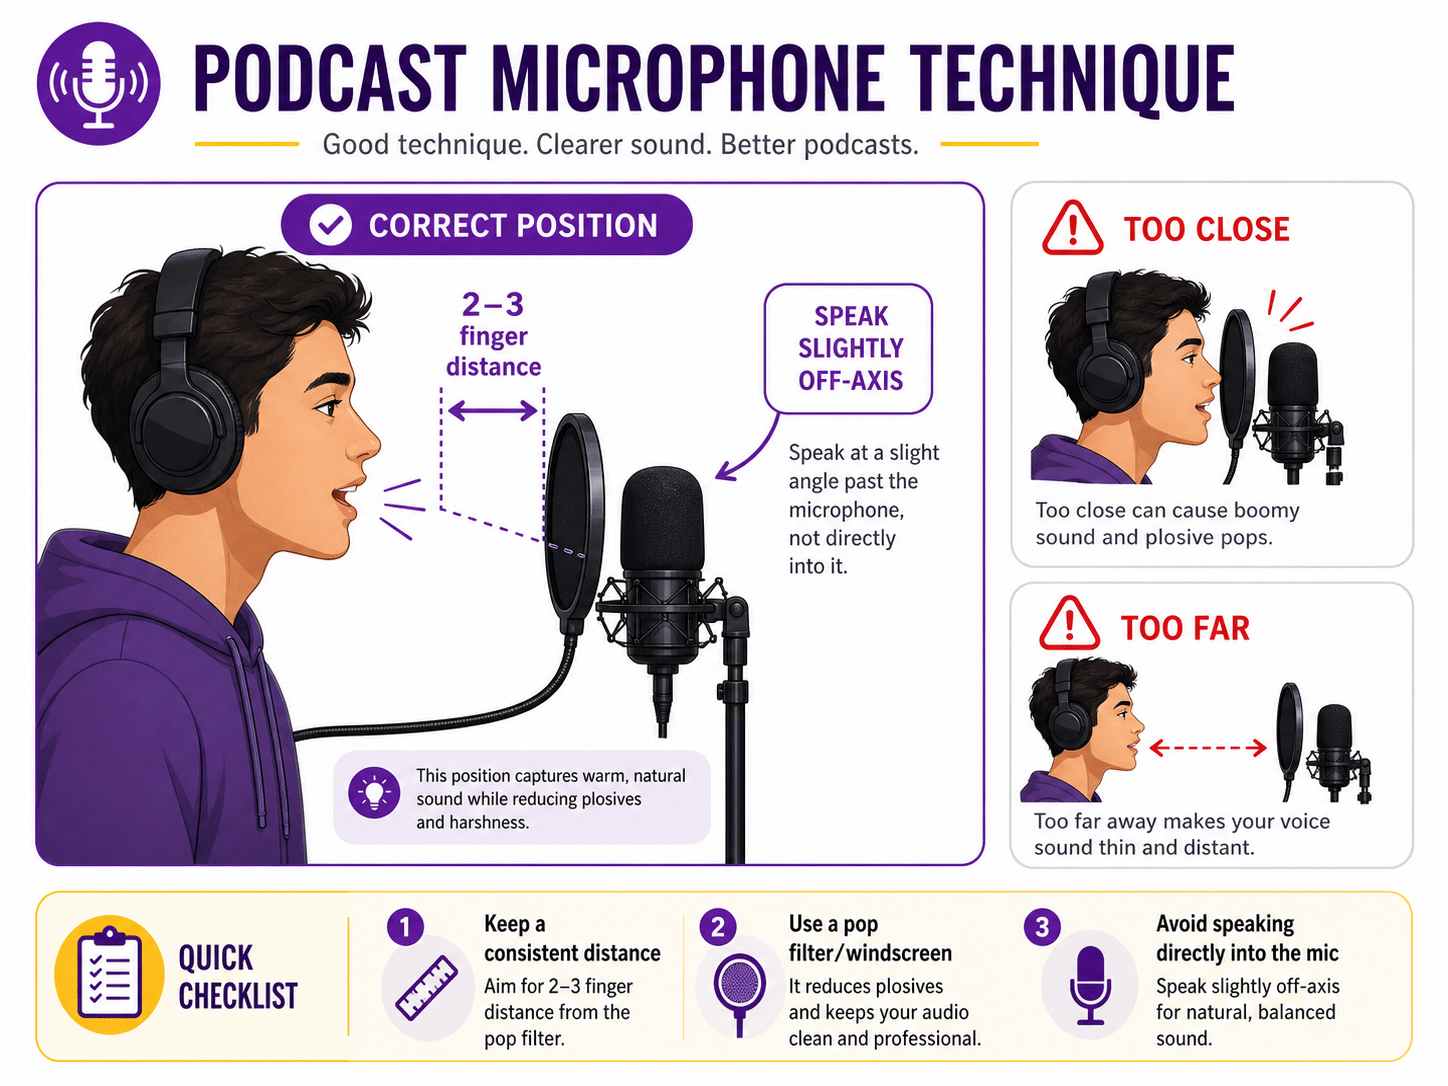
Basic Mic Technique Checklist
- Keep your mouth around 2 to 3 fingers away from the microphone.
- Speak slightly off-axis instead of directly blasting air into the mic.
- Use a pop filter or foam windscreen to reduce plosives.
- Keep your posture consistent throughout the recording.
- Avoid turning your head away while speaking.
- Do not tap the table, mic stand or cable during recording.
Common Mic Mistakes
| Mistake | What Happens | Better Practice |
|---|---|---|
| Too Close | Voice may sound boomy, distorted or full of plosives | Move slightly back and speak off-axis |
| Too Far | Voice sounds thin, distant and room echo becomes more obvious | Move closer and keep consistent distance |
| Moving Around | Volume keeps changing throughout the episode | Maintain stable posture and mic distance |
| No Pop Filter | Harsh “P” and “B” sounds hit the microphone | Use foam windscreen or pop filter |
For podcasting, dynamic microphones like the Shure SM7dB or RØDE PodMic are popular because they are designed for speech and can help reduce some room noise when used properly.
Choosing between Shure and RØDE?
Read our comparison: Shure SM7dB vs RØDE PodMic: Which Podcast Microphone Is Right for You?
3. Monitor Your Audio During Recording
If you are not monitoring your audio, you are guessing.
Many podcast problems are only discovered after the recording ends. By then, it may be too late to fix properly. Real-time monitoring helps you catch issues early, such as clipping, soft voices, loose cables, mic handling noise or background hum.
What You Should Monitor
- Voice clarity for every speaker.
- Input level and gain.
- Clipping or distortion.
- Background noise.
- Headphone bleed or echo.
- Whether each mic is recording on the correct track.
Use closed-back headphones while recording. Spotify for Creators recommends wired headphones for podcast recording and editing because they provide a stable connection without the possible audio blips or latency issues that can happen with Bluetooth options. You can read their podcast equipment guide for more beginner-friendly recording gear tips.
Useful Monitoring Tools
| Tool | Best Use | Why It Helps |
|---|---|---|
| Closed-Back Headphones | Monitoring speech and audio quality | Helps you hear noise, clipping and uneven voices clearly |
| RØDECaster Pro II | Podcast audio recording and monitoring | Useful for multitrack recording, headphone monitoring and call-in workflows |
| RØDECaster Video | Video podcast switching and production monitoring | Helps manage HDMI video sources, program view and audio/video workflow |
For more details, you can refer to the official RØDECaster Pro II product page and RØDECaster Video product page. These tools are commonly used in podcast production workflows because they help manage audio inputs, monitoring, and video production more efficiently.
Monitoring is one reason a studio operator can be valuable. While the host focuses on the conversation, someone else can keep an eye and ear on technical quality.
4. Use Better Camera Framing for Video Podcasts
For video podcasts, your camera framing affects how professional the episode feels.
Good framing does not mean the most cinematic setup. It means the viewer can clearly see the speaker, the shot feels intentional, and the visual does not distract from the conversation.
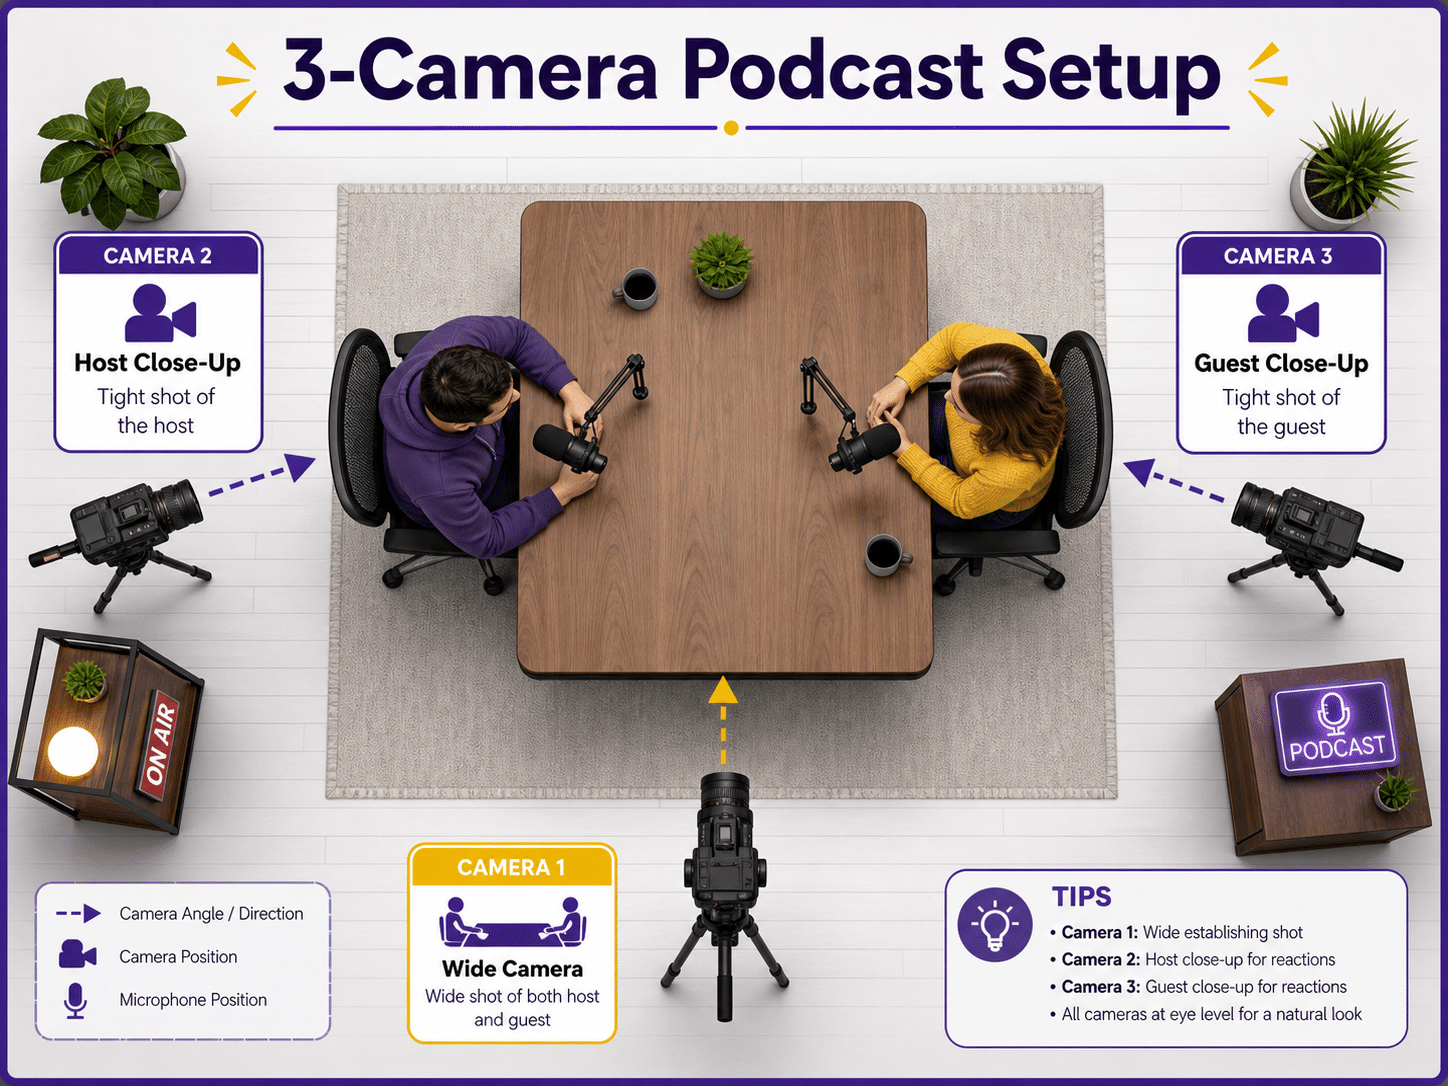
Simple 3-Camera Podcast Setup
- Wide shot: Shows the full table, host and guest.
- Host close-up: Focuses on the host during questions and reactions.
- Guest close-up: Focuses on the guest during answers and stories.
A 3-camera setup helps a video podcast feel more dynamic. It also gives editors more flexibility when cutting clips for social media.
Camera Best Practices
- Keep shots at eye level where possible.
- Avoid cutting off the top of the head or leaving too much empty space.
- Match resolution, frame rate and white balance across cameras.
- Use tripods or fixed mounts for stability.
- Check focus before recording.
- Keep backgrounds intentional and uncluttered.
Basic Camera Settings for Podcast Recording
| Setting | Recommended Practice | Why It Matters |
|---|---|---|
| Resolution | 1080p or 4K depending on workflow | Higher resolution gives more editing flexibility but larger files |
| Frame Rate | Usually 25fps or 30fps for podcast talking head content | Natural look and easier workflow for long recordings |
| Shutter Speed | Usually double the frame rate, such as 1/60 for 30fps | Creates natural motion blur |
| White Balance | Set manually and match across cameras | Keeps skin tones consistent |
| ISO | Keep as low as practical | Reduces image noise and keeps visuals cleaner |
| Focus | Use face tracking or manual focus after checking position | Prevents soft or out-of-focus footage |
YouTube recommends that uploaded content should be encoded and uploaded in the same frame rate it was recorded. This is a good reason to decide your camera settings before recording and keep them consistent across the project. You can refer to YouTube’s official recommended upload encoding settings for more details.
Not sure whether to record podcast in 1080p or 4K?
Read this article: 1080p vs 4K Podcast Recording: Which Is Better?
5. Light Your Podcast Like a Professional
Lighting can make an average camera look better and a good camera look professional.
If your video podcast looks dark, flat or inconsistent, viewers may assume the production is less polished. Good lighting makes faces clear, creates separation from the background, and helps your podcast look more intentional.
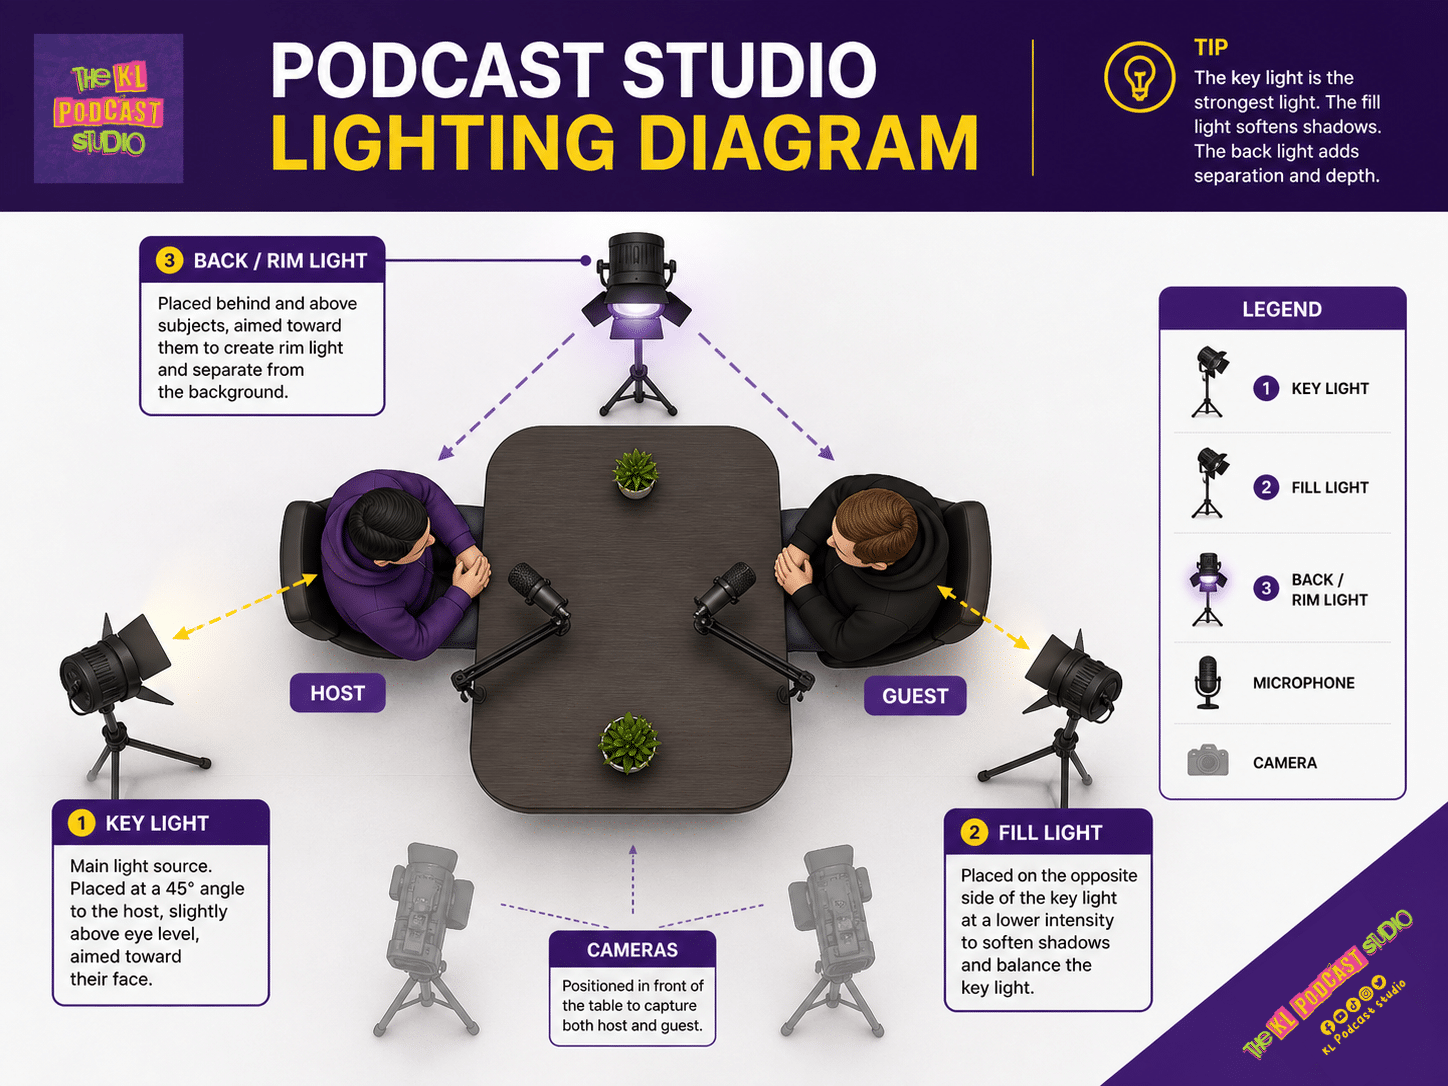
The 3-Point Lighting Setup
- Key Light: Main light that shapes the face.
- Fill Light: Softer light that reduces harsh shadows.
- Back Light / Rim Light: Adds separation from the background.
Lighting Best Practices
- Use soft light for more flattering skin tones.
- Avoid mixing too many different color temperatures.
- Set camera white balance manually.
- Use background lights or practical lamps for depth.
- Do not brighten the image only by pushing ISO too high.
- Check how the lighting looks on camera, not only with your eyes.
Common Color Temperature Guide
| Color Temperature | Look | Best Use |
|---|---|---|
| 3200K | Warm, cozy, orange tone | Moody sets, warm interiors, casual shows |
| 4000K–4700K | Neutral indoor look | Balanced studio or office look |
| 5600K | Daylight, clean, cooler tone | Bright studio look or daylight-balanced setup |
Good lighting does not only make your podcast look nicer. It also helps your clips perform better because people are more likely to stop scrolling when the visual looks clean and intentional.
6. Record Separate Tracks When Possible
One of the smartest podcast recording hacks is to record separate tracks for each microphone.
If all voices are recorded into one combined track, editing becomes harder. If one person coughs while another person talks, or one mic is louder than the other, you have fewer options to fix it.
Separate tracks give you more control in post-production.
Why Separate Tracks Help
- You can adjust each speaker’s volume independently.
- You can clean up noise from one mic without affecting others.
- You can remove interruptions more easily.
- You can balance host and guest voices better.
- You have more flexibility for professional editing.
If you are recording a serious podcast, especially with multiple speakers, multitrack recording is worth setting up from the beginning.
7. Do a Real Sound Check Before Recording
Many people do sound checks badly.
They say “testing, testing” softly for two seconds, then start the episode. That is not enough. A proper sound check should reflect how the person will actually speak during the recording.
Better Sound Check Method
- Ask each person to speak in their normal podcast voice for 10 to 15 seconds.
- Ask one natural question so they answer like a real conversation.
- Check whether anyone is too loud, too soft or too far from the mic.
- Listen through headphones, not only with your eyes on the meters.
- Record a short test clip and play it back before starting the full episode.
This small step can save a lot of frustration during editing.
8. Edit for Clarity, Not Perfection
Editing is important, but over-editing can slow down your podcast workflow.
The goal of editing is not to remove every breath, every pause, or every human moment. The goal is to make the episode clear, comfortable, and easy to follow.
Basic Editing Checklist
- Trim messy starts and endings.
- Remove long awkward pauses or repeated sections.
- Balance voice levels between speakers.
- Reduce background noise where possible.
- Add intro, outro or branding only if it improves the experience.
- Export in the right format for your platform.
- Check the final file using headphones and speakers.
If you are editing video, use templates for lower thirds, captions, intro screens, thumbnails and export settings. This makes future episodes much faster to complete.
Wondering how long one episode really takes?
Read this guide: Berapa Lama Nak Siapkan Satu Episod Podcast?
9. Plan for Short Clips Before You Record
If your podcast will be used for TikTok, Reels, Shorts or LinkedIn, do not wait until after editing to think about clips.
Plan your episode with clip-friendly moments from the beginning. This does not mean forcing viral lines. It means structuring your conversation so clear, useful and interesting moments are easier to find.
Clip-Friendly Podcast Moments
- A strong opening hook.
- A surprising answer from a guest.
- A clear framework or practical tip.
- A funny or emotional moment.
- A bold opinion or myth-busting statement.
- A short story with a clear lesson.
When the recording is clean and the conversation has strong moments, repurposing becomes much easier.
Want to use podcast clips for TikTok and Reels?
Read this article: Podcast TikTok: Strategi Baru Tarik Pendengar Gen Z
Podcast Recording Best Practices Checklist
Before your next recording session, use this checklist:
- Is the room quiet and controlled?
- Have you done a real sound check with every speaker?
- Is every microphone positioned correctly?
- Are all speakers wearing or checking headphones?
- Are you monitoring audio levels during recording?
- Are camera settings locked and matched?
- Is white balance set manually?
- Is lighting soft, balanced and consistent?
- Are files recording correctly?
- Do you have backups for SD cards, batteries, cables and power?
- Do you know which moments could become short clips?
- Do you have an editing workflow after recording?
Common Podcast Recording Mistakes to Avoid
| Mistake | Why It Hurts | Better Practice |
|---|---|---|
| Recording in a noisy room | Noise becomes distracting and hard to remove later | Choose a quiet room and test before recording |
| Bad mic distance | Voice becomes too boomy, too thin or inconsistent | Keep stable distance and speak slightly off-axis |
| No monitoring | Problems are discovered too late | Use headphones and monitor levels in real time |
| Auto camera settings | Exposure and color can shift during recording | Lock exposure and white balance manually |
| Poor lighting | Video looks flat, dark or unprofessional | Use soft key light, fill light and background separation |
| Over-editing | Episodes take too long and sound unnatural | Edit for clarity, pacing and comfort |
How KL Podcast Studio Helps You Record Better Podcasts
At KL Podcast Studio, we help creators, brands and companies record podcasts with a more controlled workflow.
Instead of worrying about microphone placement, camera angles, lighting, sound checks, and file management by yourself, you can walk into a ready podcast environment and focus on your content.
Recording at KL Podcast Studio Helps With:
- Professional microphone setup.
- Cleaner audio and monitoring support.
- Multi-camera video podcast setup.
- Lighting designed for podcast recording.
- More comfortable experience for guests.
- Files that are easier to edit and repurpose.
- A more professional impression for your audience and brand.
This is especially useful if your podcast represents your business, personal brand, corporate content, or public-facing content strategy.
FAQ: Podcast Recording Hacks and Best Practices
1. What is the most important podcast recording hack?
The most important hack is to capture clean audio from the beginning. A quiet room, proper mic placement and real-time monitoring will improve your podcast more than heavy editing later.
2. How close should I sit to the podcast microphone?
As a simple rule, keep your mouth around 2 to 3 fingers away from the microphone and speak slightly off-axis to reduce harsh breath and plosive sounds.
3. Do I need video for a podcast?
No, video is not required. However, video makes your podcast easier to repurpose into YouTube videos, TikTok clips, Reels and Shorts.
4. Should I use auto settings on my camera?
For podcast recording, it is usually better to lock exposure, white balance and frame rate manually. Auto settings can shift during recording and make the final video look inconsistent.
5. Can KL Podcast Studio help with recording quality?
Yes. KL Podcast Studio provides a professional podcast recording setup with microphones, cameras, lighting and production support so you can focus on the conversation while the technical setup is handled properly.
Final Thoughts: Small Hacks, Big Podcasting Wins
Podcast recording hacks do not need to be complicated. The biggest improvements usually come from simple fundamentals: quiet room, good mic distance, proper monitoring, stable camera framing, clean lighting and smart editing.
When these basics are done well, your podcast becomes easier to listen to, easier to watch, easier to edit and easier to repurpose.
You do not need to be perfect from episode one. But if you build the right recording habits early, every episode after that becomes smoother and more professional.
Ready to Record a Better Podcast?
Record your podcast at KL Podcast Studio and get a professional setup with clear audio, camera support, lighting and production workflow — so your podcast sounds and looks more polished from the first take.


